This page covers installing Windows 11 on UEFI or BIOS firmware. The instructions can be adapted to install Windows 8.1 update/10/11 (NOTE - previous versions of Windows do not support wimboot).
A second system is used to setup a GRUB4DOS/GRUB4EFI bootable USB and to create VHD files that will be copied to the target system. The target system has an empty/unpartitioned internal disk. This walkthrough will include using WinPE to prepare the target disk.
This page also contains information about the Windows Image format and Windows Image File Boot.
Contents -
NOTE - Windows 8.1 Update based versions of WinPE (or newer) are required to complete Stage 2. Previous versions of WinPE/Windows do not include the Windows Overlay File System driver (wof.sys) and will not recognise the filesystem extracted in stage 2. Windows 10 (1703) or newer is required to create and mount a multiple partition USB disk if a removable type disk is used.
The Windows Image (WIM) format was introduced in Windows Vista as a means of simplifying Windows deployment. Windows source files are usually distributed as .iso virtual disc images. When mounted or burned to disc, the Windows installation files can be located in \sources\install.wim.
WIM is a proprietary disk image format that contains a compressed file system. One of the unique features of the WIM format is single instance storage, which allows multiple copies of the same file to be stored once in the compressed file system. This allows install.wim, to contain multiple versions of Windows without a significant filesize increase. As an example, source files in en-us_windows_11_business_editions_updated_nov_2021_x64_dvd_0bf06ee2.iso contain 10 different images - including Enterprise, Education and Professional versions of Windows 11.
Windows installation files in \sources\install.wim are sysprepped - generalizing the image to remove computer specific information such as installed drivers and the computer security identifier (SID). The contents of install.wim can be applied/extracted to a local drive and boot files created manually - booting the drive will then compete Windows setup.
The Deployment Image Servicing and Management tool (DISM) can be used to apply/extract images from install.wim - when using DISM the /Index: switch is used to select which image to apply. wimlib is an open source alternate that can be used for some of the DISM commands including creating WIM files, extracting images, updating or deleting files, etc.
WIMBoot (Windows Image File Boot) was introduced in Windows 8.1 Update.
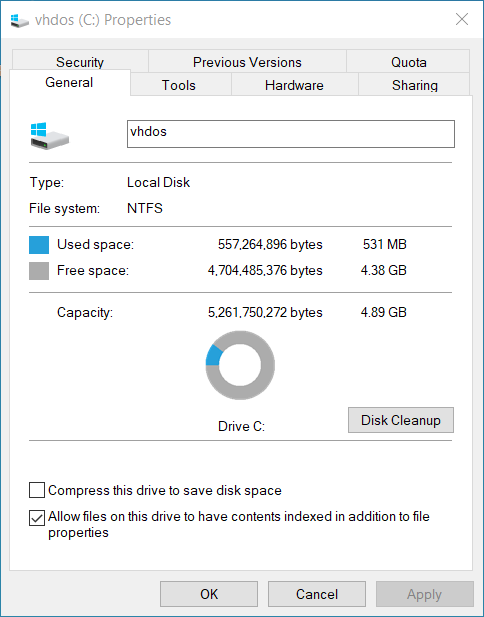
Screenshot of systemdrive properties - Windows 10 WIMBoot is installed in a 5GB .vhd file. Used space is 531 MB, however the .wim file on the backing disk is an additional 6.9 GB -
The following table has been included as a reference to devices, files and paths that are used in the instructions in this page -
| GRUB4DOS Device + path |
Windows Mountpoint + path |
Notes |
|---|---|---|
| N/A | C:\ | Windows 10 Host Operating System. |
| N/A | D:\temp | Workspace on the host system. |
| N/A | D:\temp\svbus | Path to SVBus driver files on host system. |
| N/A | E:\ | Mount point for Windows Installation Media .iso file (Windows 11 source) |
| N/A | E:\sources\install.wim | Source file containing sysprepped Windows installation. This will be required in step 2 (see here) |
| N/A | R:\ | USB boot partition. |
| N/A | S:\ | USB data partition. |
Create a bootable USB drive - this process is covered in more detail here. Include WinPE as this will be required to mount and edit the registry during the installation following the first reboot (to disable hibernate).
It is possible to create a wimboot compatible .wim file by extracting an existing image from install.wim.
NOTE - install.wim can contain multiple images. Adjust image/SourceIndex number in the steps below to select the required Windows version. As an example, install.wim from a Windows 11 source .iso contains 10 different images, including Enterprise, Education and Professional versions of Windows 11 - image/index 3 is Enterprise.
The Deployment Image Servicing and Management tool (DISM) is backwards compatible, however previous versions of DISM may not support all commands when newer Windows sources are used. To avoid compatibility issues, the DISM version included in the Windows source ISO (\sources\dism.exe) can be used to apply/extract the contents of an image in \sources\install.wim.
Create a temporary work directory -
Use DISM to create a wimboot compatible .wim file (S:\win11wimboot.wim) from the selected image in E:\sources\install.wim (image 3 in the command below). Example using DISM from the Windows installation media -
Remove the temporary work directory -
Alternative using wimlib -
Add the following entries to R:\menu.lst (if the instructions here were followed there should be an existing file with an entry for WinPE) -
Note the use of the map --top --mem command - see here for more information.
See here for more information about the configuration file \menu.lst, including potential issues with multiple configuration files on the same system.
Add the following entries to R:\EFI\grub\menu.lst (if the instructions here were followed there should be an existing file with an entry for WinPE) -
Note the use of the map --top --mem command - see here for more information.
See here for more information about the configuration file \EFI\grub\menu.lst, including potential issues with multiple configuration files on the same system.
Copy svbus driver files from D:\temp\svbus\ to S:\svbus\
Create directory S:\svbus\ -
Copy files from D:\temp\svbus\ to S:\svbus\ -
The contents of the USB FAT32 partition should be similar to the following (there will be other sub-directories and files in R:\boot\ and R:\EFI\) -
Contents of the USB NTFS partition -
Proceed to stage 2 after completing the steps listed above (see here)
Document date - 12th April 2023