This page covers cloning an existing Windows 10 and setting up a dual boot Windows installation on UEFI or BIOS firmware. The instructions can be adapted to install Windows 8.1 update/10/11 (NOTE - previous versions of Windows do not support wimboot).
For more information about the Windows Image format - see here. Windows Image File Boot is covered here.
NOTE - Windows 8.1 Update or newer versions of Windows are required to complete Step 8. Previous versions of Windows do not include the Windows Overlay File System driver (wof.sys) and will not recognise the filesystem extracted in step 7. Windows 10 (1703) or newer is required to create and mount a multiple partition USB disk if a removable type disk is used.
The following table has been included as a reference to devices, files and paths that are used in the instructions in this page -
| Windows Mountpoint + path |
Notes |
|---|---|
| C:\ | Windows 10 Operating System. |
| D:\temp | Workspace on the host system. |
| D:\wimboot.vhd | Virtual Hard Disk (VHD) - this will be created in step 5 (see here). |
| D:\temp\SVBus\svbus.inf | SVBus driver file(s) - these will be installed to the offline Windows installation in step 2 (see here). |
| D:\temp\SVBus\instx64.exe | SVBus installer used in step 2 (see here). |
| R:\ | USB boot partition. |
| S:\ | USB data partition. |
| V:\ | Mount point for Virtual Hard Disk partition 1 - target for UEFI/BIOS boot files. |
| W:\ | Mount point for Virtual Hard Disk partition 2 - target for Windows 10 operating system files. |
Create a bootable USB drive - this process is covered in more detail here. Include WinPE as this will be required in step 4 to capture/clone the Windows installation.
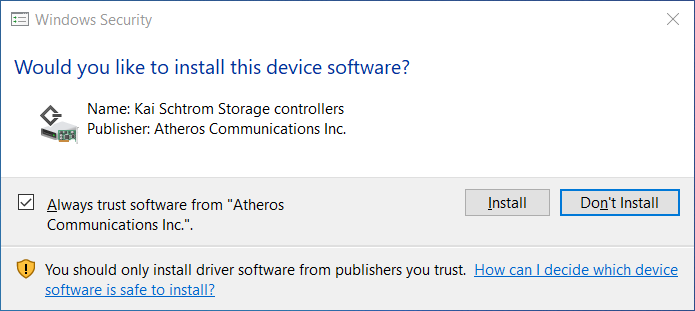
In this step we will be installing SVBus to the live Windows system that will be cloned. Taking a backup of the Operating System is recommended before proceeding.
Run the following in an elevated cmd prompt (cmd.exe > run as administrator) -
You will be prompted to install the SVBus driver - select Install
Output -
The SVBus developer recommends disabling hibernation. In this step we will be disabling hibernation in the live Windows system before it is cloned. Taking a backup of the Operating System is recommended before preceding.
Open a command prompt (run as administrator) and execute the following command -
This step should be completed using WinPE - capturing the Windows system whilst it is offline. Boot the GRUB4DOS\GRUB4EFI bootable USB device.
Use the DiskPart list volume command to identify the drive letters for the Operating System to be cloned (C: in the example below) and the destination (D: in the example below)
If using DISM (note the use of the /WIMBoot parameter) -
Alternative using wimlib (note the use of the --wimboot parameter) -
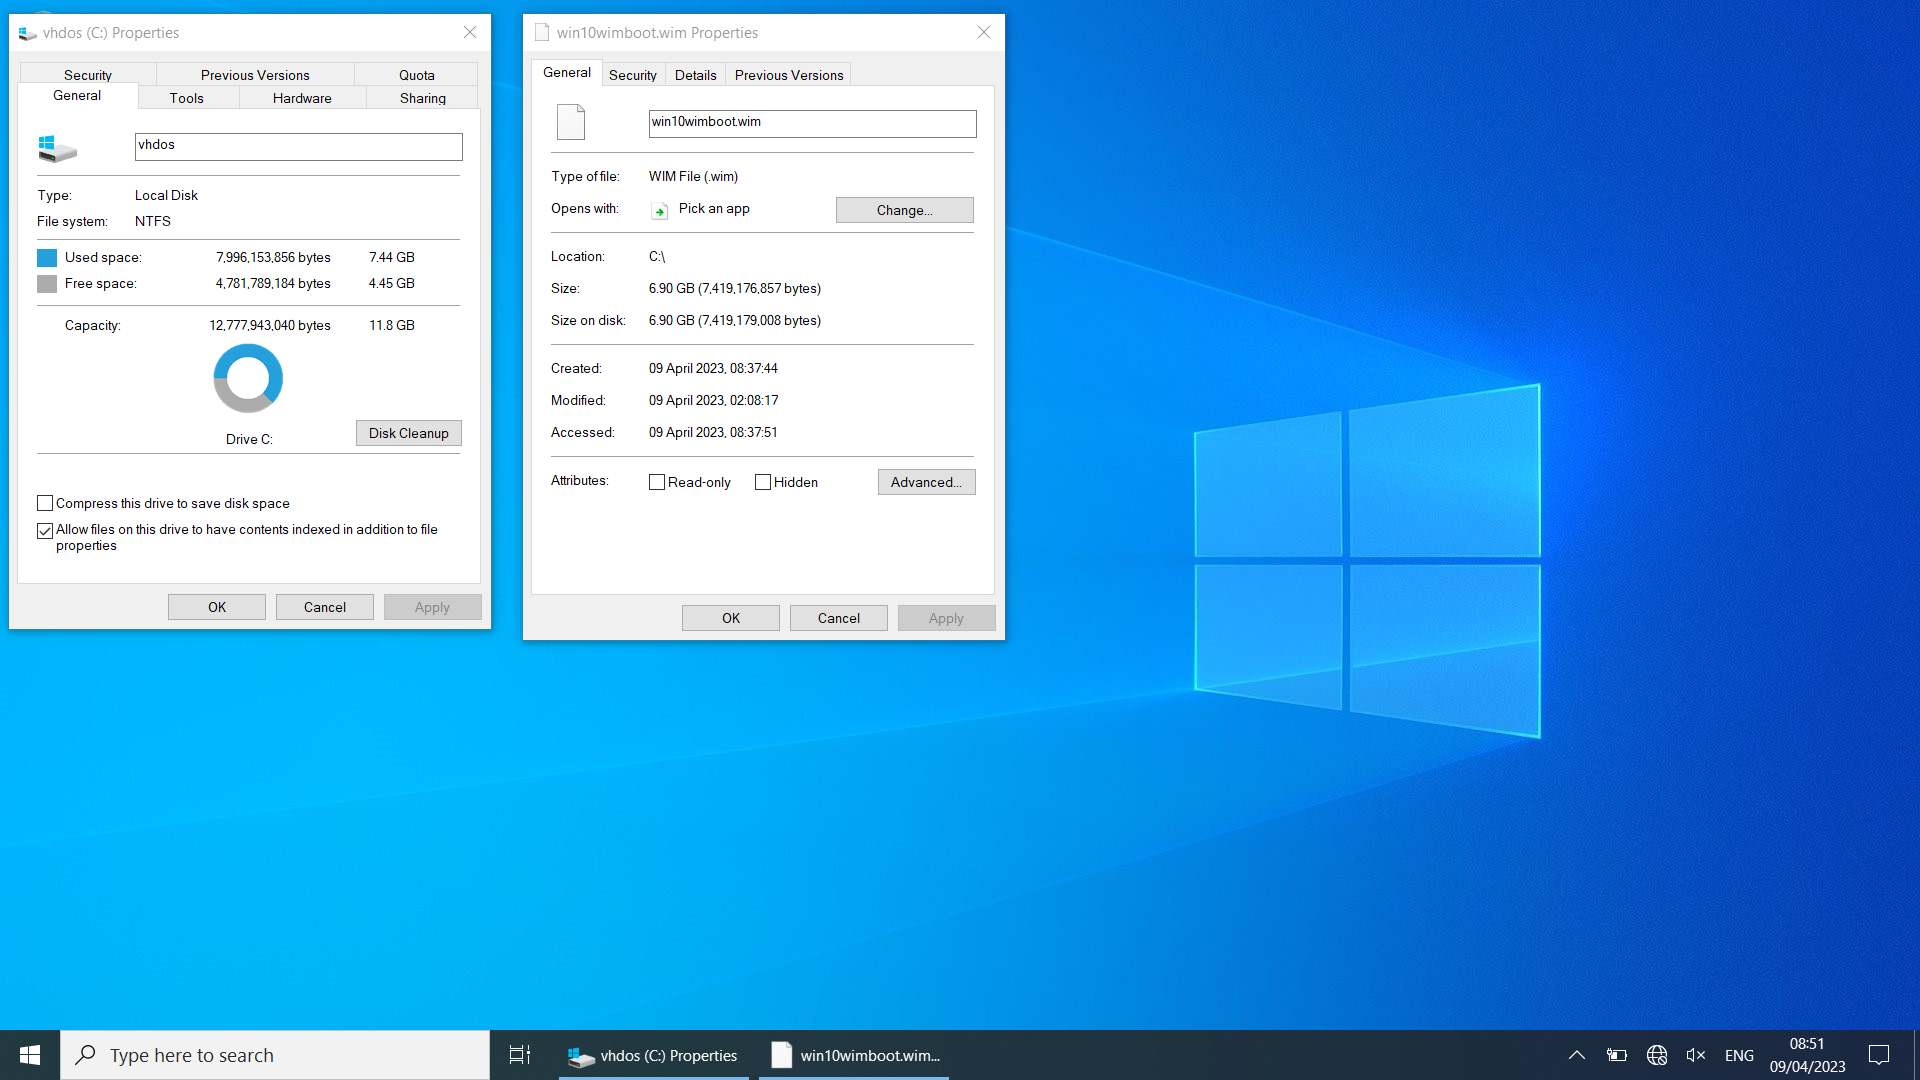
On the test system (the ThinkPad T470s), the operating system being cloned contained Windows 10 21H2 with updates and Office 2016 installed. Disk usage prior to capture was 24 GB. win10wimboot.wim file size = 6.9 GB.
The remaining steps can be completed in WinPE. Alternatively, reboot to Windows 10 and complete the remaining steps in a full OS.
Proceed to step 5b if following the instructions for use on low RAM systems.
A VHD with two partitions is used as this supports booting the same file on UEFI and BIOS firmware. The first partition (FAT32 file system) will be used for the boot files required to load the operating system located in the second partition when the VHD is mapped using GRUB4DOS/GRUB4EFI (see here for more information).
For the Windows 10 WIMBoot tests, the following DiskPart commands were used to create a 12GB virtual hard disk (change size, filename, path and mount point according to your own requirements) -
Ignore this step if you followed step 5a.
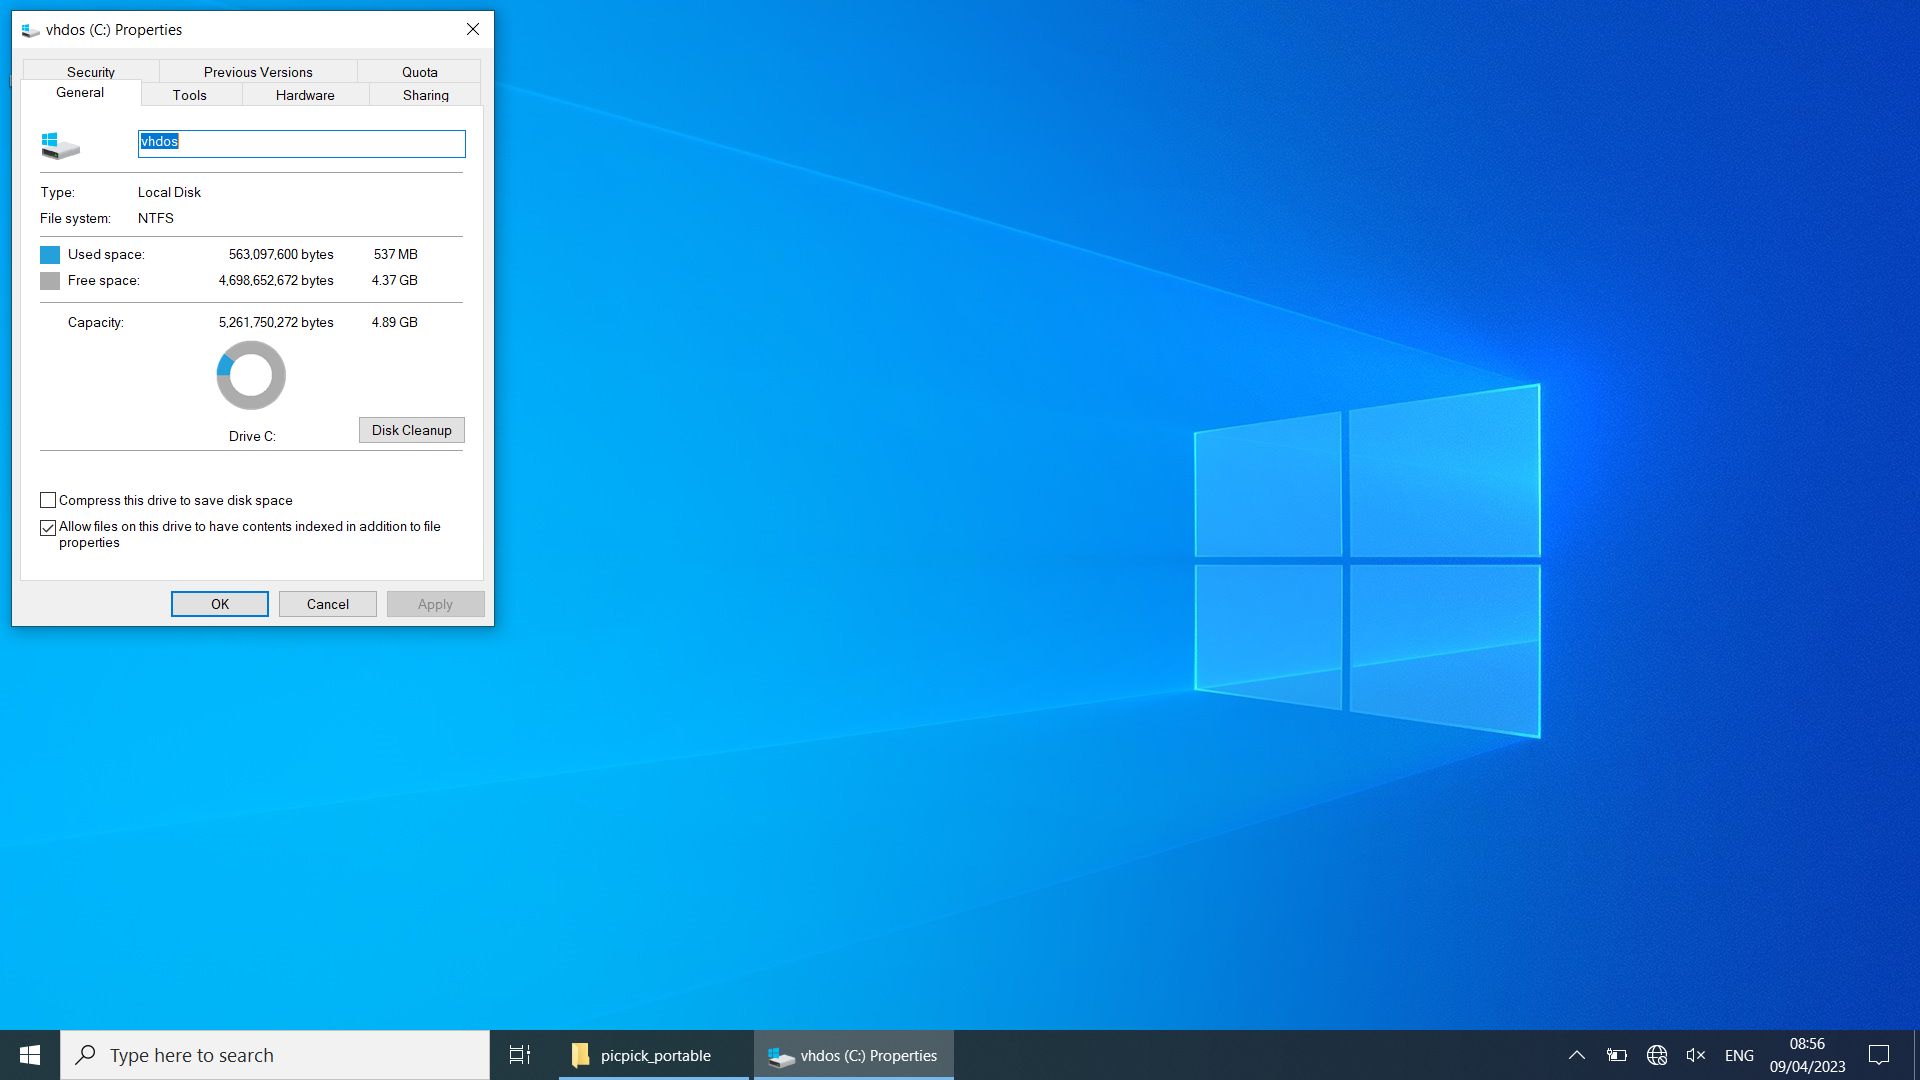
On low RAM systems, win10wimboot.wim can be left in the path D:\temp\win10wimboot.wim rather than being copied to the mounted VHD file. This can significantly reduce RAM usage when mapping the VHD file as a RAM disk, as the VHD file only needs to be large enough for file dependencies that are extracted in full from win10wimboot.wim (in step 7b). Additional space is required for the systemdrive so that Windows will run, however the RAM requirement is effectively reduced by the file size of win10wimboot.wim.
For the Windows 10 WIMBoot tests, the following DiskPart commands were used to create a 5GB virtual hard disk (change size, filename, path and mount point according to your own requirements) -
Ignore this step if following the instructions in Steps 5b and 7b (low RAM systems)
Copy the wimboot .wim file to partition 2 in the mounted VHD file -
Proceed to step 7b if following the instructions for use on low RAM systems.
Extract the contents of image 1 in W:\win10wimboot.wim to the target drive (W:\ - partition 2 in the mounted .vhd file) - adjust paths as required. Note the use of the /WIMBoot parameter -
Alternative using wimlib. Extract the contents of image 1 in W:\win10wimboot.wim to the target drive (W:\ - partition 2 in the mounted .vhd file) - adjust paths as required. Note the use of the --wimboot parameter -
Ignore this step if you followed step 7a.
On low RAM systems, win10wimboot.wim can be left in the path D:\temp\win10wimboot.wim rather than copied to the mounted VHD file. This will reduce RAM requirements by the file size of win10wimboot.wim when mapping the VHD file as a RAM disk.
Extract the contents of image 1 in D:\temp\win10wimboot.wim to the target drive (W:\ - partition 2 in the mounted .vhd file) - adjust paths as required. Note the use of the /WIMBoot parameter -
Alternative using wimlib. Extract the contents of image 1 in D:\temp\win10wimboot.wim to the target drive (W:\ - partition 2 in the mounted .vhd file) - adjust paths as required. Note the use of the --wimboot parameter -
NOTE - do not move, rename or delete D:\temp\win10wimboot.wim if using this method.
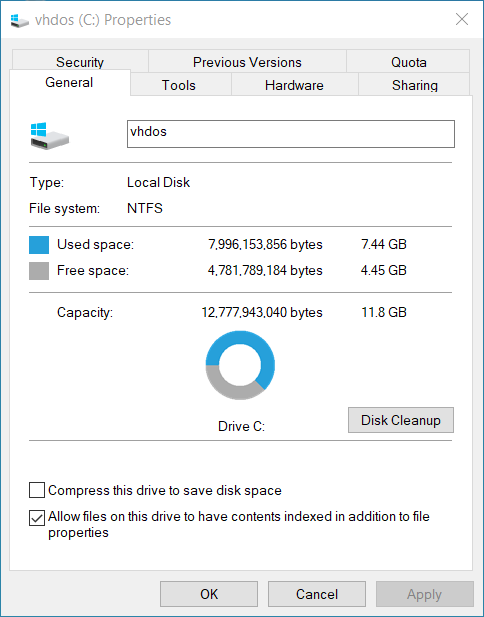
Comparison between step 7a and step 7b - available disk space when Windows 10 is booted and running from a RAM disk -
 |
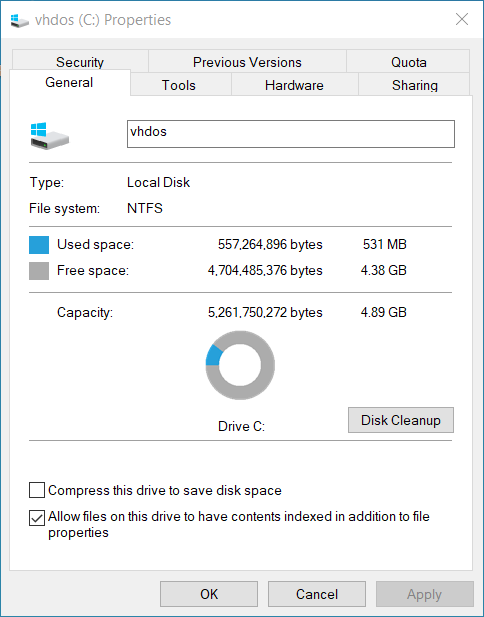 |
| 1. Step 7a (wim in VHD) | 2. Step 7b (wim on SSD) |
Use the bcdboot command to create boot files in Drive V:\ (the first partition in the virtual hard disk. See here for more information about bcdboot usage).
Specifying the /f ALL parameters will create BIOS and UEFI boot files, facilitating the use of the VHD on BIOS or UEFI firmware.
The following tasks will be completed in this step -
Mount registry > delete MountedDevices key > delete pagefile > disable Windows Update > unmount registry
Mount the drive W: system and software regsitry hives - this is the operating system applied to VHD partition 2 in step 7.
Delete the HKLM\_SYSTEM MountedDevices key (this is the mounted W:\Windows\system32\config\system registry hive). Clearing the MountedDevices key will force the cloned Windows to reallocate drive letters - resulting in the cloned operating system being mounted as C: when booted.
Clear the existing pagefile settings (HKLM\_SYSTEM MountedDevices is the mounted W:\Windows\system32\config\system registry hive) -
Disable Windows Update. Recommended to avoid the free disk space being filled with updates.
Unmount the registry hive -
Enter the following DiskPart commands to detach/unmount the virtual hard disk -
Add the following entries to R:\menu.lst (if the instructions here were followed there should be an existing file with an entry for WinPE) -
Note the use of the map --top --mem command - see here for more information.
See here for more information about the configuration file \menu.lst, including potential issues with multiple configuration files on the same system.
Add the following entries to R:\EFI\grub\menu.lst (if the instructions here were followed there should be an existing file with an entry for WinPE) -
Note the use of the map --top --mem command - see here for more information.
See here for more information about the configuration file \EFI\grub\menu.lst, including potential issues with multiple configuration files on the same system.
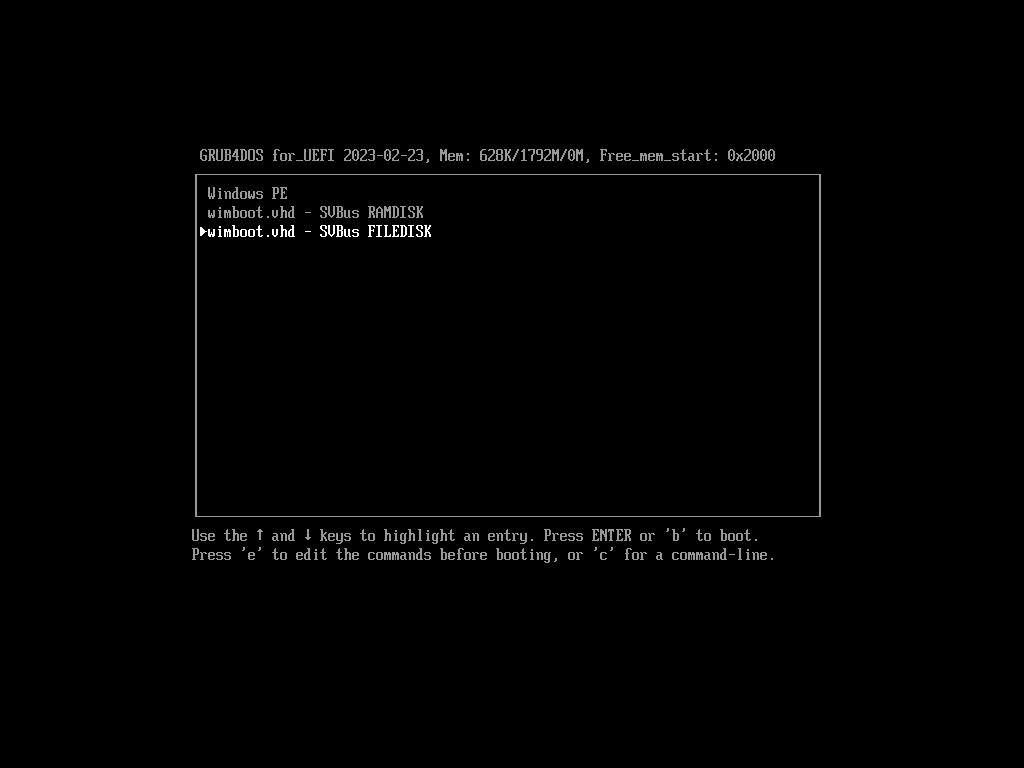
Following the installation, Windows can be booted by first booting GRUB4DOS\GRUB4EFI and then selecting either the wimboot.vhd - SVBus FILEDISK or wimboot.vhd - SVBus RAMDISK menu entries.
Screenshot of Windows running in a RAM disk - Step 7a followed with the wim backing file contained in the GRUB4DOS/GRUB4EFI mapped VHD (note the disk usage is 7.44 GB with win10wimboot.wim taking up 6.9 GB of the available space) -
Screenshot of Windows running in a RAM disk - Step 7b followed with the wim backing file running from the internal SSD rather then the VHD (note the disk usage - 537 MB) -
Document date - 12th April 2023